Trip Planning
Trip plan and risk assessment
We should always write a concrete trip plan for the trip we are going on. It is common to plan a plan A and a plan B.
Contents
The trip plan
We should always write a concrete trip plan for the trip we are going on. It is common to plan a plan A and a plan B. Plan A is the main plan for the trip, while plan B is the fallback plan. You should also have a crisis plan – plan C. This is meant to help you if something goes wrong.
In addition, make a fallback plan that goes through a different area than the main plan. That way you have the chance to carry out the trip even if the weather or the conditions do not turn out as planned.
-
Plan B - fallback plan
By making a plan B, or fallback plan, we are better prepared if something unforeseen happens.
Remember to draw plan B onto the map. Those taking part in the trip must be informed about plan B and possible changes to the route. Before the trip you should hold a ferdaråd (a pre-trip safety discussion), covering:
- What would it take for the route to be changed?
- One example is how much wind to put up with before turning back
- Should we reroute straight away if we know the conditions will be difficult?
Fallback plan in a different area
Think through what could put a stop to the original plan. Examples might be wind, snow conditions or heavy precipitation. Make a fallback plan in an area that is not as exposed to wind and weather.
- What would it take for the route to be changed?
-
Plan C – crisis plan
Make a plan that is meant to help you if something goes wrong on the trip. Whether an accident happens or you do not reach the cabin. Remember telephone numbers and alerting procedures in the plan.
The trip plan for the trip we are going on is filled in according to the suggested content for trip plans, inspired by Horgen and Christoffersen (2019):
| Plan A – main plan | Plan B - fallback plan | Plan C - crisis plan |
|---|---|---|
| 1) Drawing the route onto the map, with | ||
| a. Start point | ||
| b. Route choices | ||
| c. Camp sites | ||
| d. End point |
-
Written plan for the trip a. Participants b. Tent groups or groups c. Day plan d. Route description with distances and metres of ascent e. Form of overnight accommodation f. Allocation of responsibilities g. Food h. Equipment i. Shared equipment j. First aid | 1) Alternative route(s) a) The route is drawn onto the map b) Places where we can seek shelter or alternative overnight accommodation (drawn on the map)
-
Make a written plan that sets out a) possible adjustments to plan A b) is there a possibility of getting down off the mountain quickly if necessary? c) equipment we might need in various scenarios – for example a sleeping bag if we have to spend the night out.
Inform participants about plan B and possible changes to the route. | 1) Map sketch with a) cabins/emergency shelters b) settlements or mobile coverage c) route choices out of the area 2) Written plan a) Who has first-aid competence b) Who has safety equipment c) Alerting procedures d) Mobile coverage e) Response time for getting help 3) Arrangements to strengthen the group’s preparedness for accidents a) What do we do if someone gets separated from the group? b) What do we do if someone is injured? c) How do we keep the injured person warm? d) How do we transport the injured person? 4) Alerting a) 113 b) 112 – if the phone you are calling from is locked. |
Risk assessment - what can go wrong
Trip planning.
On a trip, unforeseen things can happen. It is wise to think about what can go wrong, in order to get a better overview of the risk factors on the trip.
Typical events that affect the trip
- Bad weather
- Illness/injury among participant(s)
- Damaged equipment such as a rucksack or boots
- Challenging terrain
- Day marches that are too long
- Wading across rivers swollen by flood
- Avalanche danger
- Psychosocial conditions within the group
- Overestimating/underestimating abilities within the group
- Participants not told about challenges
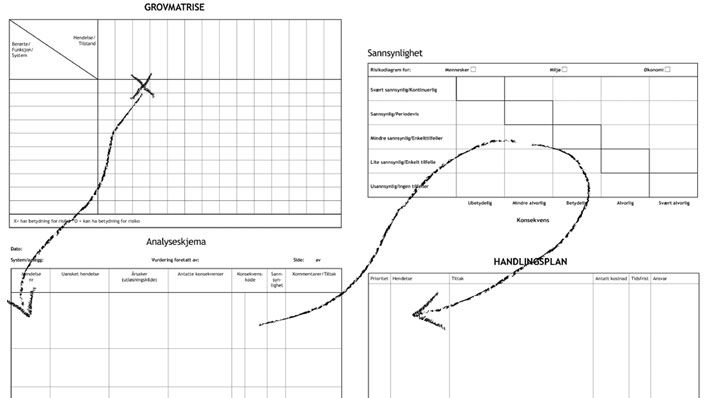
The most common methods of risk assessment are risk and vulnerability analysis (ROS) and the 3x3 filter model. Whereas in the ROS analysis you list risk factors and measures, the filter model takes account of weather and conditions, terrain and people at different levels of detail. The filter model is a more dynamic model with ongoing assessments while on the trip as well, whereas in the ROS model you assess risk only beforehand.
The risk assessment is a good basis for making an alternative trip plan, plan B, in case not everything goes as planned. If an accident happens, it is also good to have a crisis plan: plan C.
ROS analysis (risk and vulnerability analysis)
DSB - the Norwegian Directorate for Civil Protection and Emergency Planning has produced a guide to filling in a risk and vulnerability analysis (ROS):
Temaveiledning i risikoanalyse for risikofylte forbrukertjenester
As an aid to identifying hazards on a trip, DNT Oslo og Omegn has produced a risk assessment for its trip leaders. The form lists many risk factors, along with suggested measures to prevent serious consequences. This overview can be a great help when you need to think about what could happen on trips you are going to lead or take part in.
[Form: DNT Oslo og Omegn](https://s3-eu-west-1.amazonaws.com/turistforeningen/files/0a95e2b78c66c74d49f4436f7ffc05b636bda4e1.pdf)
Form: DNT Oslo og Omegn
A suggested simplified ROS analysis is attached. (The template file has not been migrated yet.)
The 3x3 filter model
The 3x3 filter model is widely used in winter friluftsliv and travel in steeper terrain, but it can also be used for ordinary camp activities (Jakobsen & Pulli, 2021; Lundhaug & Østrem, 2019).
The filter model is used both as a planning tool and for assessing hazards along the way. The point is to continuously assess the possible consequences of unwanted events. Probability calculation is not the focus. Horgen and Christoffersen (2019) highlight alertness in the situation as decisive for spotting possible hazards.
| Munter’s 3x3 filter model | Conditions | Terrain | People (the group) |
|---|---|---|---|
| Regional | |||
| (trip planning) | |||
| Local | |||
| (area assessment) | |||
| Zonal | |||
| (single-slope assessment) |
To get good use out of the 3x3, it is important that you do not settle for filling in only the first row; «Sorted, got the map and a spade in the rucksack and that’s that!» Just as important as the planning beforehand is that you assess the conditions along the way and are just as attentive to changes in the weather and snow conditions as to changes in your own and others’ physical and mental state.
(Moland, 2017, 8)
Explanation of the filter model
-
Regional level - done in the classroom
We assess the conditions out in the area we are going to. This means we check the weather forecast and other information about the avalanche forecast that we find at varsom.no and in the RegObs app. Next we look at the terrain. Here the group can study the map and discuss steepness, release areas, runout areas and any terrain traps.
Finally we have to assess those who are going to take part. What equipment do we need in order to go on the planned trip, what experience do the participants have and how large is the group. How are we going to organise the group?
-
Local level - on the trip
- Keep making new assessments
- Ask whether people are all right
- Keep an eye on the terrain
- See whether the weather changes
On the trip we, as a group and as a class, have to assess the weather conditions, terrain and people the whole time. Look out for which hazards are most prominent. Is it, for example, sliding, an avalanche or getting chilled? Take risk-reducing measures such as covering bare skin if it is cold, checking on each other if there is a lot of wind, or going up gentler slopes if the snow is very hard and it is difficult to get a grip with the skis.
-
Zonal level - situation assessment
Along the way on a ski touring trip we may perhaps notice something unforeseen, such as an area being steeper than the preparations could have suggested, or noticing changes in the snowpack. Then we are at the zonal level and again have to assess the situation anew. We then decide which measures need to be taken so that the group can safely move on. With good assessment at all three levels of the 3x3 filter model, you can minimise unwanted events on a trip.
As an example, we can imagine going on a ski touring (topptur) trip in winter with the friluftsliv class. This tool can be used both in the planning and along the way on the trip.
An example of what you should assess when you use the filter model.
[Source: K. Sazanova and J. Moland, 2015, https://s3-eu-west-1.amazonaws.com/turistforeningen/files/f4b0f3385b03619488605f42932ad94e94e67226.pdf](Turplan%20og%20risikovurdering/f4b0f3385b03619488605f42932ad94e94e67226.pdf)
Source: K. Sazanova and J. Moland, 2015, https://s3-eu-west-1.amazonaws.com/turistforeningen/files/f4b0f3385b03619488605f42932ad94e94e67226.pdf
Next steps
- Examples of trip plans — concrete examples
- The fjellvettreglene — the nine rules to remember
- Safety on the trip and evaluation after the trip — carrying it out and reflecting afterwards
- Turning back in good time — assessment along the way
Learn more
- DNT — the fjellvettreglene — nine rules to remember
- Varsom — hazard warnings for avalanches, floods and landslides
- UT.no — routes, cabins, warning data
- Yr.no — weather forecast