Trip Planning
Route choice and SARTTO

Time estimation, handrails, catching features and the SARTTO/ARTOT method for systematic route choice and trip planning in the mountains.
- Contents
Time estimation
- A normal walking pace is 3.5 km per hour on a mountain path, carrying a 10 kg pack.
- On steep climbs (with a pack) allow about 15 minutes extra per 100 metres of ascent.
- Add 1 hour of breaks per 5 hours of walking — for adults.
- Larger groups also take longer, as there are more short stops. Reckon on losing at least 0.5 km/h.
(Maske, 2013)
Route choice
Study the map carefully and get an overview of the area you are going to travel through. Mountain maps are coarse, and small details on the map can be large and significant in reality. Look at the landforms: are there wide, open valleys, or is the terrain broken and hummocky? Do rivers and lakes have to be crossed? Where are you going from and to? Does your route run across or along marked terrain features? Are there many built structures in the area? Are there distinctive landmarks, prominent ridges or summits that help you know where you are? All of this gives you a basis for sitting down and planning your chosen route in detail, from one point to the next.
Handrails
Map of the terrain around Ingemannhytta in Vesterålen. Map source: Norgeskart.no
Following handrails in the terrain makes navigation simpler and safer. By handrails we mean landscape features that run in the same direction you intend to travel. A path, a forest track, rivers and lakes are examples of good handrails. Larger handrails are small valleys or ridges. The map clearly shows how the paths around Ingemannhytta follow the valley hollows and lead up through small gullies. By planning your route so that you follow handrails running in your direction of travel, you avoid constantly meeting valleys and ridges crossing your path, which can confuse your sense of direction and your navigation.
Intermediate points / catching features
Image 2: Norgeskart.no
By dividing the route into stages, you get confirmation that you are following the line you planned, and you notice more quickly if you are drifting off the planned route. Find intermediate points such as distinctive terrain features or built structures that give you clear indications that you are on the right track. In poor visibility and in confusing terrain, it is wise to have many intermediate points and to make sure you are on the right track before continuing. Examples of intermediate points might be a riverbed, cabins, power lines, a lake or steep mountainsides.
On the map to the left there are many good catching features. On the path between Navarsete and Fivla, you follow the river to the end of the valley and then steeply up through a gully. At the top of the gully you follow the eastern side of Heggedalsvannet, before climbing again along a stream up a gully, until it levels out at the top.
Think the route through
Once you have settled on the route you want to follow, you should also think through the following:
- Will you have to ford rivers during the trip? Are the bridges in the area in place? Or have they been taken in for the winter?
- Are there options for changing the route? Where can you seek help, and how can you get back to safety if a participant falls ill, is injured or runs out of strength? Where is there mobile coverage?
- How long should you allow for the different stages?
- In summer the weather can affect how easy the going is in several ways: is there a lot of snow left from the winter? Is there a risk of fresh snow? Has it rained recently, are the rivers high?
- In winter there are other things to consider: have there been large temperature swings recently? Has there been heavy snowfall in the area? What is the prevailing wind direction (the most common wind direction) and how has the snow drifted? This affects the avalanche danger. Are there regulated lakes with uncertain ice or surface water in the area (contact the local power company if you are unsure)?
Map revision
A map is not always accurate. A map is a picture of the terrain on the day it was made. A long time can pass between each revision the Norwegian Mapping Authority (Kartverket) makes to its maps, and a great deal may have changed if the map is old. Maps always state the year they were made. On norgeskart.no you will always find the most up-to-date maps.
Possible changes worth being aware of:
- New built structures (roads, power lines, dams, cabins) may have appeared or been removed.
- Rerouted trails, for example because of wild reindeer migration.
- New or altered protected areas.
You will usually be informed of any significant changes by the Norwegian Mapping Authority (Kartverket) or by the local hiking club. It is worth checking the map online and seeing whether details on the paper map match the map information online.
Safety
It is important to think about safety in your planning. Remember to carry out a risk assessment and to make a plan B.
Risk assessment: Trip plan and risk assessment In winter it is important to check the avalanche forecast if you are going to travel in avalanche terrain.
Read more about avalanches: Avalanches
SARTTO/ARTOT
It can be useful to draw up a SARTTO, or an ARTOT as it is called in the military. The point of writing down all the “legs” you are going to walk is to make it easier to find your way if fog and bad weather set in. Draw the route onto the map as well.
SARTTO
S — Location description with grid reference (Stedsbeskrivelse)
A — Distance (Avstand)
R — Direction (compass bearing) (Retning)
T — Terrain (Terreng)
T — Time (Tid)
O — Catching feature (Oppfang)
ARTOT
A — Distance (Avstand)
R — Direction (compass bearing) (Retning)
T — Time (Tid)
O — Catching feature (Oppfang)
T — Terrain (Terreng)
-
Location description with a full grid reference
In a rescue operation you will have several points along the route where you have taken a grid reference. Grid references make it easier to work out where you are on the map.
More on grid references: Grid reference — telling others where you are
-
Distance
It is important to keep track of how far it is to the next point.
-
Direction
The precise bearing, corrected for magnetic variation (declination), is entered for each distance. Check that the bearing matches the compass direction you are going to walk. Here is how to take a compass bearing.
-
Terrain
In poor visibility it is important to know what the terrain is like up to the next point. Does it go up, down or slope off to the side? This can be hard to read from the map in a near gale, but it is very easy to do indoors before the trip (Unger, 2010).
-
Time
Depending on the type of trip and what you have to carry, you can estimate the time for each stage. A normal walking pace is about 3.5 kilometres per hour with a light load (Maske, 2013). If the pack is heavy, the pace drops to 2.5 kilometres per hour. Add about 15 minutes extra per 100 metres of ascent. The number of participants and their fitness affect how long it takes. Remember that breaks come on top of this.
-
Catching feature
For each point you pick out, it is important to find a handrail running across your line that you would have to cross if you walked past the point. It is wise to write down the distance to this catching feature for each (part-)stage (Unger, 2010).
Once you have made a SARTTO for the route in question, you can enter the route coordinates for each point into a GPS receiver. Then you will be well prepared for the trip.
Example of a SARTTO
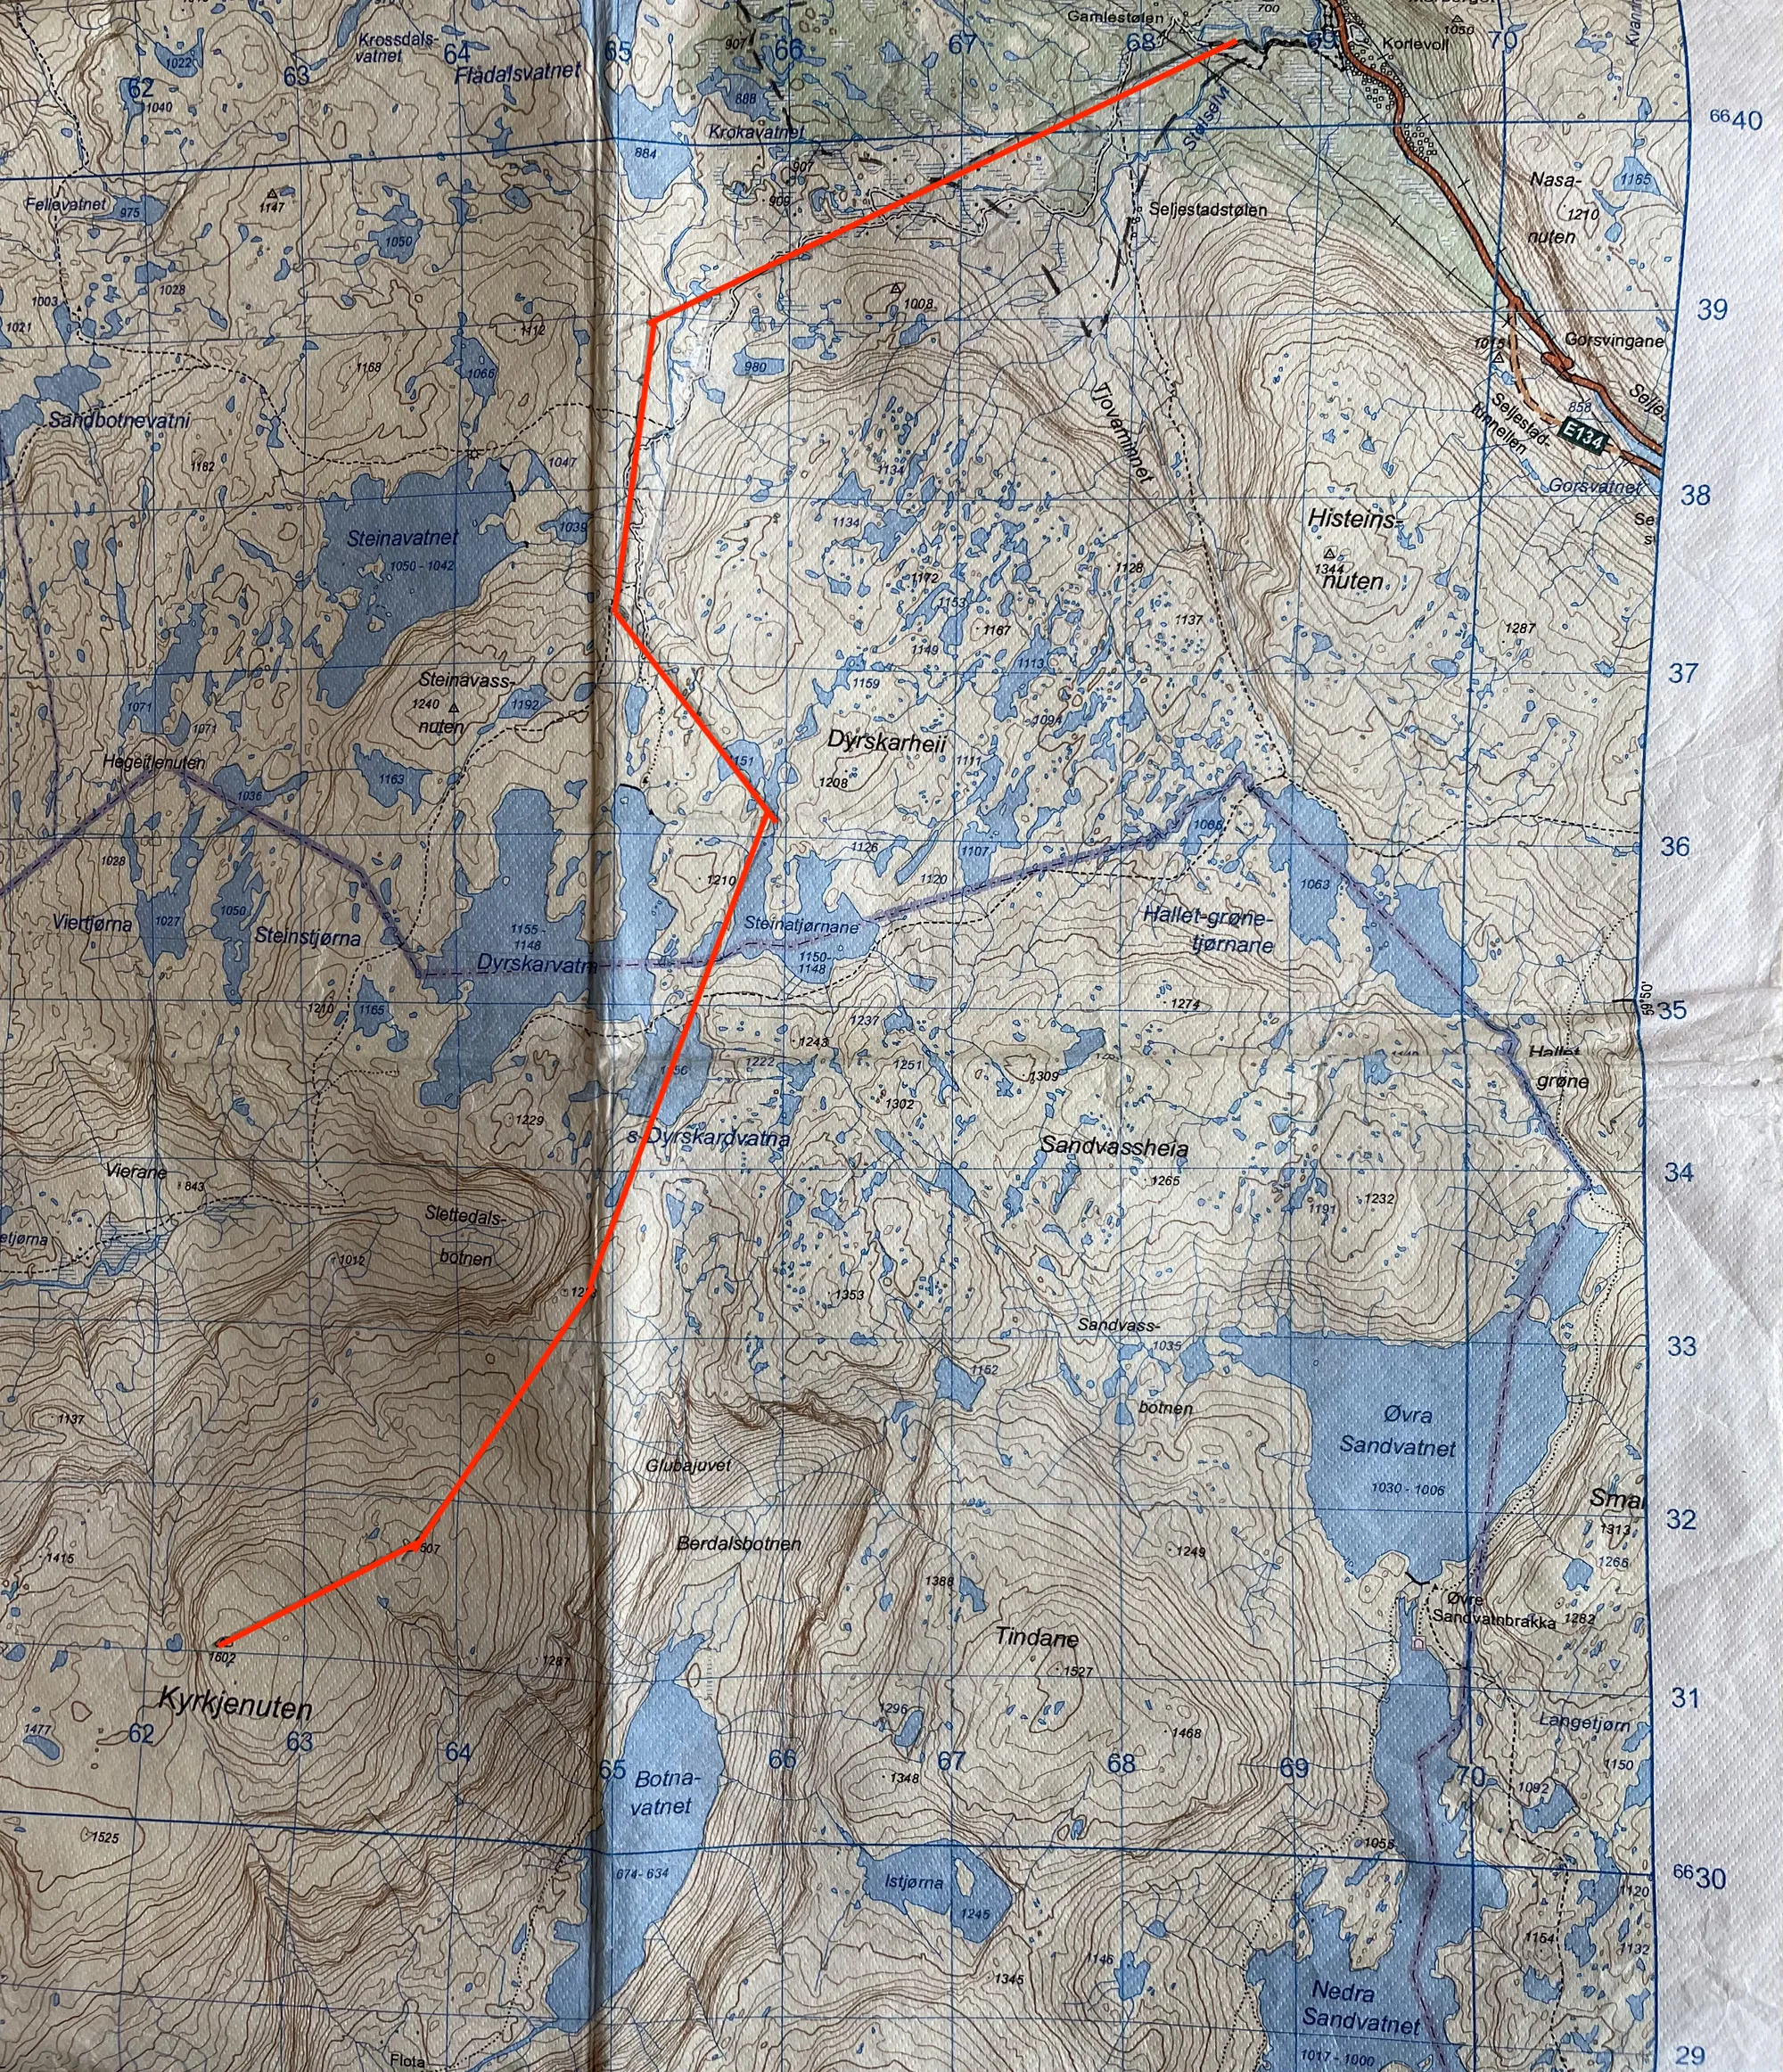
The example is a ski tour from Korlevoll, near Røldal, to Kyrkjenuten. This is a very long trip with a lot of ascent. In total it is over 26 kilometres round trip (there and back). Because of the trip’s length, it is best done in spring, when there is daylight in the evening too.
In planning the route, account has been taken of the terrain, the avalanche danger and the handrails. The first bearing is fairly long, which increases the likelihood of navigation errors. It is important to keep an eye on the terrain to be sure you are in the right place. A good reference point is the river that has to be crossed. If you cross too far north, the climb after the river will be very steep. Further on, on the next bearing, the ridge to the east will be a good catching feature, but it is also a runout zone for avalanches. The bearing has therefore been set to the west of the river.
The area is rough and broken, with a number of stream ravines. These are good handrails, but also terrain traps. The third bearing runs through the middle of one such ravine; here you should consider staying on the upper side because of the avalanche danger.
The time estimate is based on a pace of 3–3.5 kilometres per hour, with about 15 minutes added per 100 metres of ascent. Both your watch and your altimeter can be useful to keep an eye on, to gauge expected progress and where you are.
SARTTO table: Gina Wigestrand, Snuitide
SARTTO Korlevoll to Kyrkjenuten
The map below shows the route in red, with all six bearings.
Next steps
- Trip plan and risk assessment — the plan A/B/C structure
- Digital trip-planning tools — map apps and route tools
- Trip plan examples — concrete examples
- Turning back in good time — decisions along the way
Learn more
- DNT — fjellvettreglene — the nine mountain-safety rules (fjellvettreglene)
- Varsom — hazard warnings for avalanches, floods and landslides
- UT.no — routes, cabins, warning data
- Yr.no — weather forecast