Navigation
Navigation in the winter mountains
Sometimes it is especially good to find the hytte. From Hurrungane in January.
Contents
 *
*
Sometimes it is especially good to find the hytte. From Hurrungane in January. Photo: Øystein Ormåsen
Few of us set out on a trip in the winter mountains when the weather is bad and visibility is poor. Nor should we. It is, after all, risky. When nature shows its muscles and lets the forces loose, it is best to stay indoors.
Even so. We live on the west coast. If we only go out when the sun is shining, we will not get many trips. We have to venture out even when the weather is only half decent. That is when we need to be able to find our way with map and compass. Here are 13 tips on map and compass for you who travel on skis in the high mountains in winter.
13 tips for better navigation
1. Plan the trip
Draw the route on the map in advance. Mark places where you must be especially alert, ideally with an exclamation mark. Are you passing any hytter on the trip? Mark them too, ideally with a yellow highlighter. Hytter offer emergency shelter in a crisis.
 *
*
The route is drawn on the map — including assessment points where I must be especially alert. Photo: Øystein Ormåsen
2. Keep the map out the whole time
For that you need a map case that does the job. The map case must be waterproof, light and sit close to the body. I prefer transparent plastic map cases. I fit a cord to wear behind the neck and a cord with a carabiner to wear around the waist. The map sits so that the area I am walking in points in towards the body. That way I avoid rain, sleet and drifting snow settling on the map as I walk. If I am clever (and lucky) I can fold the map so that the last part of the trip lies visible on the other side of the plastic case. Then I simply turn the map case round before the last part of the trip.
3. Use a proper compass
— and be prepared to have to walk a compass course over longer distances. Get yourself a mirror compass sooner rather than later — ideally with a slope-angle gauge included. Attach the cord on the compass to your jacket pocket, so it is easy to reach.
 *
*
Get yourself a mirror compass and a good map case. Photo: Øystein Ormåsen
 *
*
Two straps on the case are necessary. Photo: Øystein Ormåsen
4. Read the map in good weather
— and notice how what you read off the map looks in reality. A map is a simplified model of reality. Many terrain details are not on the map. If reality does not agree with the map — then it is reality that wins. You will not get good at navigating without reading the map the whole time.
5. Learn to think SARTTO
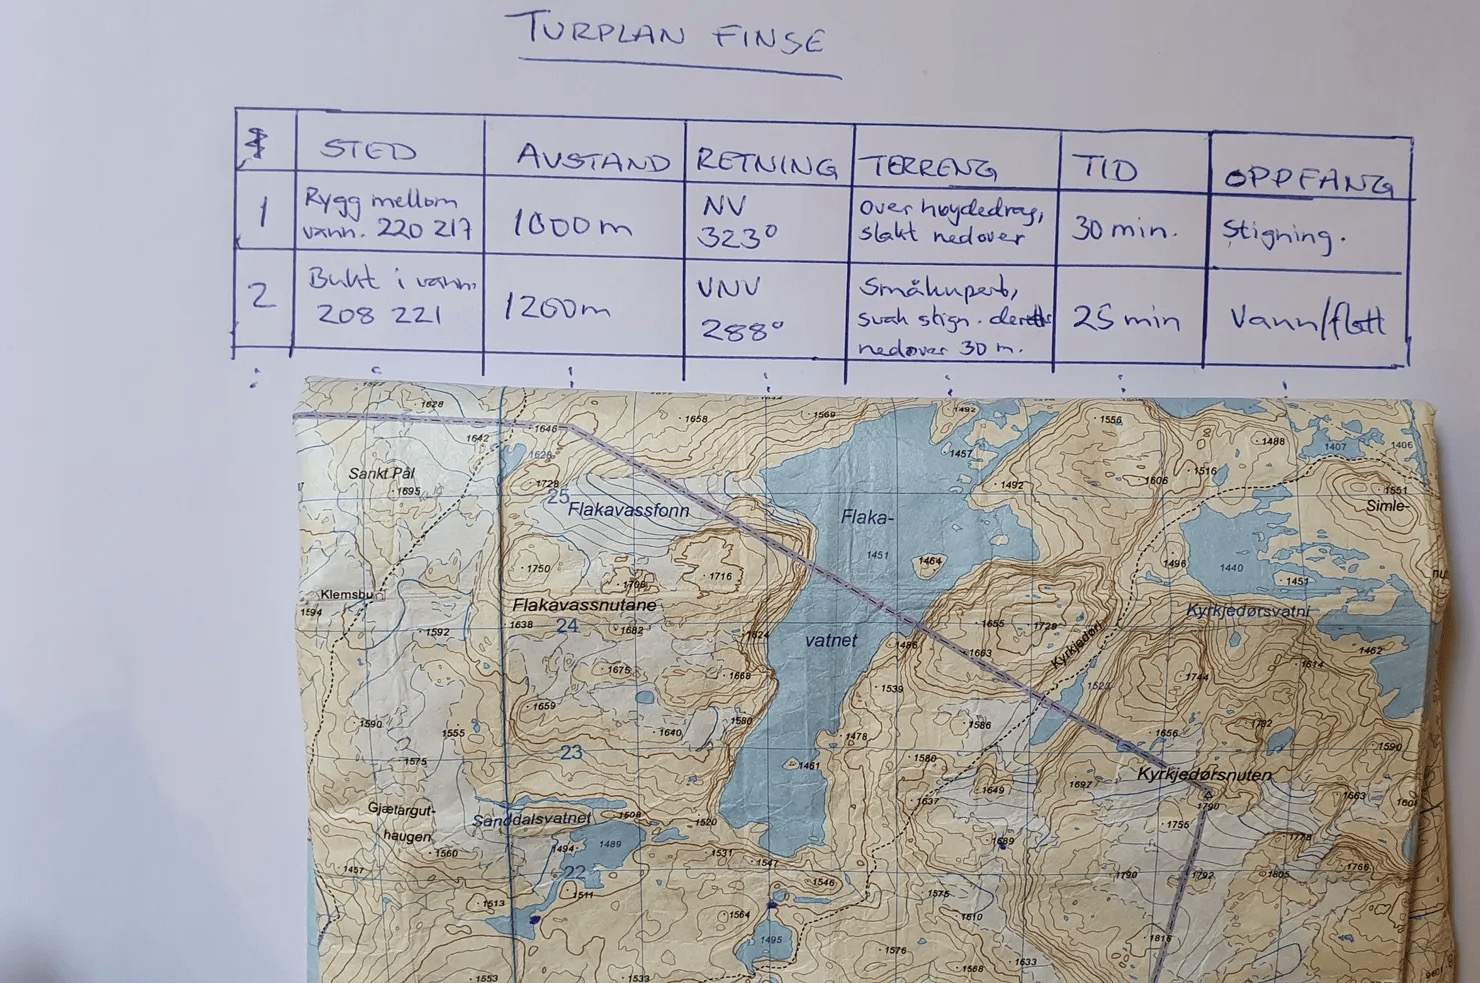
What is it? A system for planning a leg of the trip, including the compass course. A SARTTO form gives information about the place you are heading to (Stedet), the distance to it (Avstanden), the direction you are to walk in (Retningen), the expected time (Tidsbruk), a description of the terrain (Terrenget) and the «catch» (Oppfanget). What is a catch? It is the easily recognisable terrain formation that you will reach with certainty if you walk too far on the compass course. A kind of safety net that you build in when you take a compass course.
Here you will find more information about SARTTO and how to make a SARTTO.
 *
*
Example of a SARTTO form. Photo: Øystein Ormåsen
6. Gather information actively
Many terrain formations are wiped out by the snow, and visibility is often limited. The winter mountains give you few points of reference during navigation. So you must be extra careful to seek information from your surroundings. Get an overview when you are about to read the map. That means you have to come out onto the edge, up onto the knoll, out of the gully. Are you unsure where you are? Probably because you are standing in a hollow where you see little.
7. Take relatively short compass courses
1–2 km is enough. That increases the chance of hitting the mark. Have you forgotten how to take a compass course? Here we explain how you take a compass course.
8. Always double-check the compass course
Does it make sense? Which direction of the compass are you to walk in? Towards the north-west? Then the course should be roughly 315 degrees. Did you get 320? Then it is probably right. Did you get 135? Then you placed the compass the wrong way round while you were taking the course.
9. Use sighting points ahead of you
Use sighting points ahead of you when you walk a compass course — if such things exist. They can be large rocks, a rock face, masts, hytter, cornices or the like. When you have found a sighting point that lies on your compass course — put the compass away and walk to the point. Repeat the procedure. This gives efficient progress. The mirror compass is a great help in such situations.
 *
*
Use sighting points in the terrain that lie on your compass course. Photo: Øystein Ormåsen

Photo: Øystein Ormåsen
10. Do not run out of energy
It is mentally and physically demanding to do fine navigation in bad weather in the winter mountains. Make sure you eat and drink regularly, at least once an hour. Otherwise you easily run empty. Then you lose concentration and make mistakes. And that is the last thing you need. Prepare yourself for the fact that it is going to take time to find your way with map and compass. A speed of 2–3 kilometres an hour is the best you can manage if you are good at navigating.
11. Use your skis as a sighting line
when you walk a compass course in poor visibility. If you lack good sighting points in the terrain ahead of you, you can hold the course by letting the edge of one of the skis beneath you line up with the direction of the compass’s straight edge. You hold the compass in your hand in front of you. It is demanding to walk like this over long distances, but it works.
12. Aim off on purpose
When you take a compass course towards a small formation in bad weather — deliberately aim a little to the side of the target. You are, after all, going to miss the target. If you have prepared yourself to miss towards the west, say, then you know you should search towards the east. You do not know that if you thought you would walk straight onto it — but miss. Then, in the worst case, you have to search both towards the east and towards the west to find the point.
 *
*
Use the skis as a sighting line when you walk in poor visibility and have no other references. Photo: Øystein Ormåsen
13. Form an expectation
Form an expectation about the next leg you are to walk. Share it with your companion — or talk to yourself: «We will continue eastward over flat terrain and have the low ridge formation right to our left for about one kilometre. There the ridge turns towards the north, while the terrain ahead of us opens up. Then we have reached the 1183 lake. We cross it on compass course 88 degrees for 800 metres, until we see the rock face rise up at the eastern end of the lake.» The purpose of the expectation is to catch mistakes early, in case you lose your direction. Below you see an example from a trip last autumn.
[Video clip 1: Finding out where I am — and forming an expectation about the next leg Photo: Øystein Ormåsen. Wild Voss. https://video.wixstatic.com/video/63281a_7980f15f69fd4e28998a441fd306efa0/1080p/mp4/file.mp4](https://video.wixstatic.com/video/63281a_7980f15f69fd4e28998a441fd306efa0/1080p/mp4/file.mp4)
Video clip 1: Finding out where I am — and forming an expectation about the next leg Photo: Øystein Ormåsen. Wild Voss. https://video.wixstatic.com/video/63281a_7980f15f69fd4e28998a441fd306efa0/1080p/mp4/file.mp4
[Video clip 2: Reality check. Did the expectations match reality? Photo: Øystein Ormåsen. Wild Voss. https://video.wixstatic.com/video/63281a_15d524dd48314979b7f83ef92f3ac9ee/1080p/mp4/file.mp4](https://video.wixstatic.com/video/63281a_15d524dd48314979b7f83ef92f3ac9ee/1080p/mp4/file.mp4)
Video clip 2: Reality check. Did the expectations match reality? Photo: Øystein Ormåsen. Wild Voss. https://video.wixstatic.com/video/63281a_15d524dd48314979b7f83ef92f3ac9ee/1080p/mp4/file.mp4
Text, photos and video: Øystein Ormåsen, Wild Voss (2021)
Next steps
- Navigation — the hub
- Navigating by nature’s signs — navigating without map and compass
- Avalanches — Terrain — assessing terrain in winter
- Turning back in good time — navigation and the decision to turn back
Learn more
- Kartverket — map base data and symbols
- Norgeskart — interactive map
- Norges Orienteringsforbund — sport and courses
- UT.no — route data