Climbing
Glacier travel
Walking on a glacier in a rope team — it requires an ice axe, crampons, a rope and knowledge. A specialised form of mountaineering and walking on snow and ice.
- Contents
Glacier travel in brief
- Glaciers are snow that has been turned into ice and that moves like a frozen river
- We walk roped up on a glacier to keep ourselves from falling into a crevasse and getting hurt
- A snow-covered glacier is where there is snow over the ice
- Blue ice is where the snow has melted away, often in icefalls
- The ice often has a blue colour, hence the name blue ice
- In late winter the crevasses in the glacier are usually covered with snow, and we can ski on top of the glacier
- Glacier travel as a leisure activity began in the 19th century
- To travel on a glacier you need equipment such as a climbing rope, a harness, a helmet, crampons, an axe and rescue gear
- Always bring a glacier guide when you travel on a glacier, or join a glacier course
Glacier travel on Eventyrisen in Jotunheimen!
History
As early as the 16th and 17th centuries there is documented travel across glaciers such as Jostedalsbreen and Folgefonna. The glaciers were crossed first and foremost from east to west and the other way round in order to trade. The route over the glacier was shorter than going around it. The Little Ice Age waned in the 18th century, and with warmer weather the glaciers retreated and travel across them became more difficult. At the start of the 19th century, more and more wealthy Englishmen came to visit Norway. They wanted to experience Norwegian nature and hired local farmers who could guide them across glaciers and up onto mountain summits. National Romanticism made its entrance, and mountain-sport activities also became popular among a steadily growing Norwegian bourgeoisie through the 19th century. The influx became so great that a dedicated guiding service was established for the glacier, which was later replaced by the trekking association’s licensed-guide service. The licensed guides were the forerunners of today’s glacier instructors (Horgen, 2008).
Equipment for travelling on a glacier
To travel on a glacier you mainly need three things:
- Someone with the competence to travel on a glacier
- At least three people to go with
- Safety equipment
- Climbing rope — 50–60 metres (one rope per rope team)
- Harness
- Ice axe
- Crampons
- Helmet (if we are going to travel on ice)
- 1 carabiner
- 1 screwgate carabiner
- 1 sling of 120 cm
- 1 sling of 60 cm or one quickdraw
- 2 prusik slings
- 1 ice screw
- 1 snow anchor
- If you are going to carry a heavy pack you also need a chest harness/full-body harness and an attachment sling
A rope team on the way back to Fonnabu. Photo: Gina Wigestrand, Snuitide
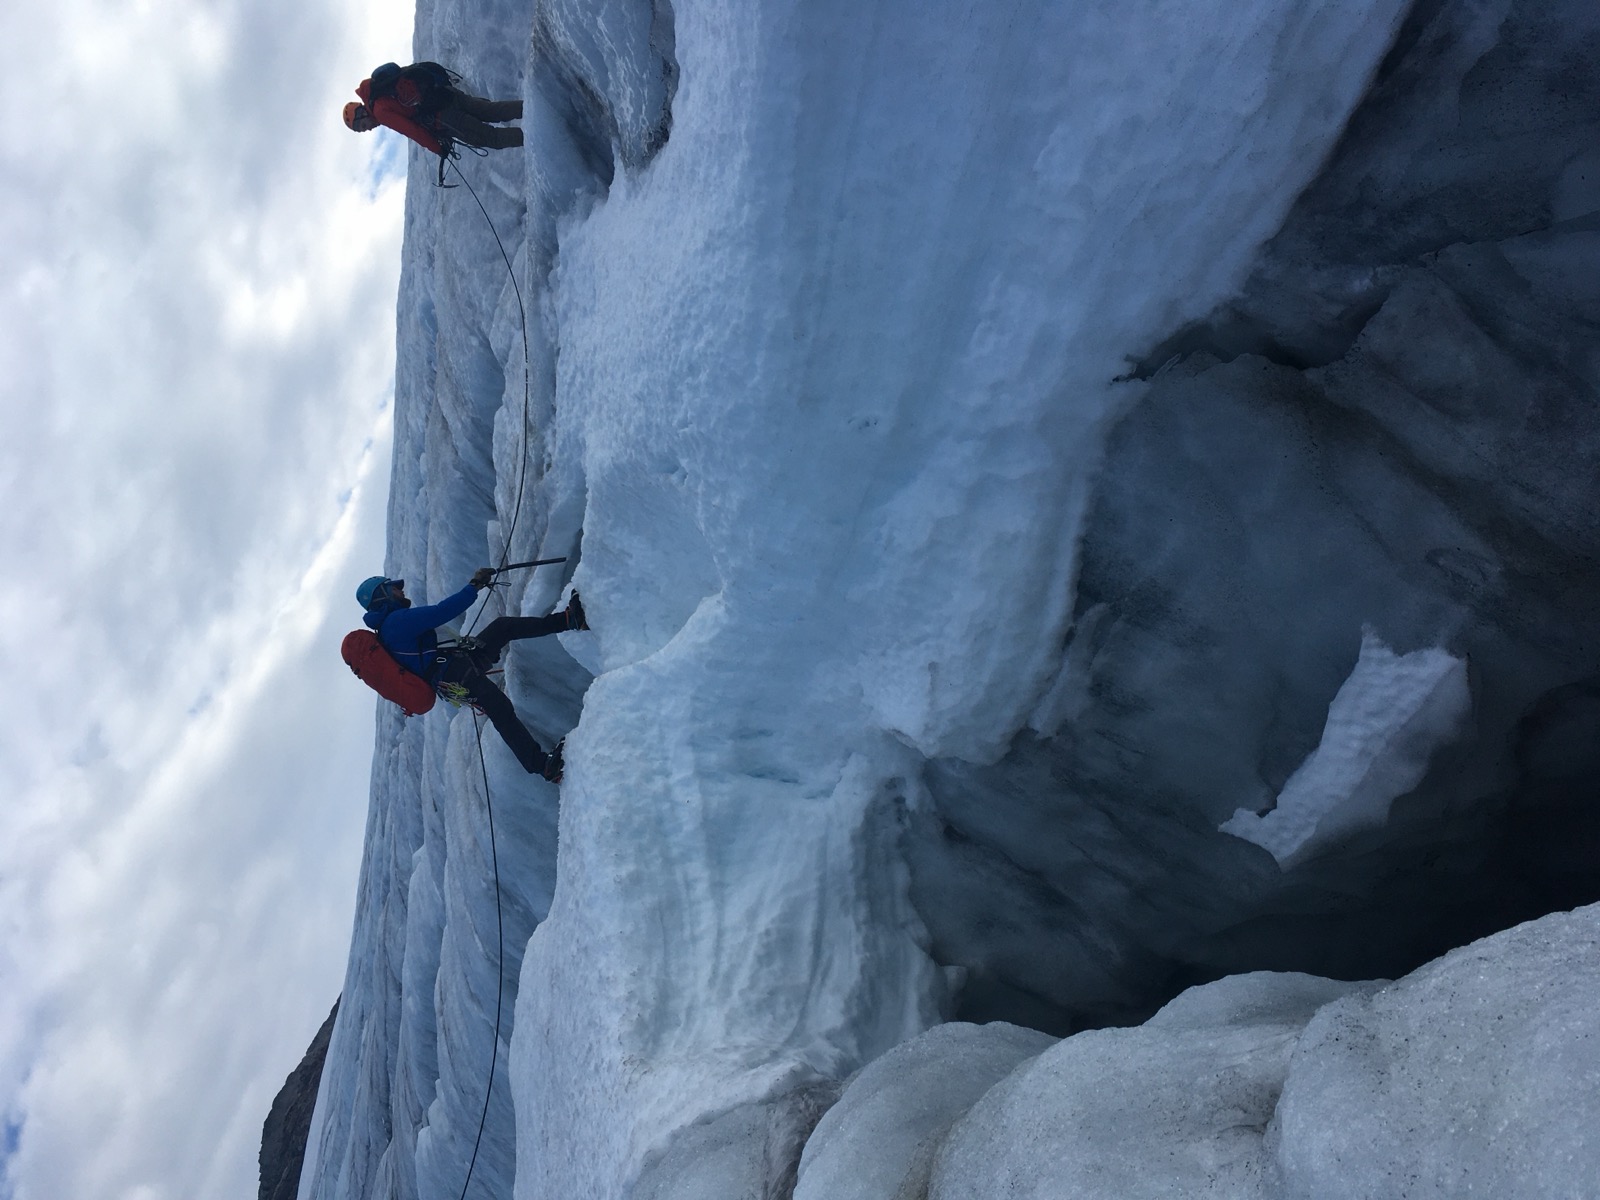
On a glacier we travel roped up, to prevent slips and to limit a fall into a crevasse. We use the rope differently than in climbing, because we move mostly across rather than upwards. The body weight of the people you are roped up with is the most important thing. The weight of the others in your rope team is what will arrest you if you fall. That is why you should always be at least four in the rope team (Haslene, 2008).
We use crampons and an ice axe to get the best possible footing when we travel on ice and step across crevasses. The rest of the safety equipment is for being able to rescue others if they fall into a crevasse and to be able to place intermediate anchors where needed.
A glacier guide has learned how we rescue others out of crevasses and has a lot of experience in travelling on a glacier. As a result they will know where it is sensible to go and assess where there may be areas with many crevasses. Glacier guides also often know a great deal about the glaciers and the surrounding nature. That can make the trip especially interesting.
Travelling on a glacier
On a snow-covered glacier we should always travel roped up because we cannot see the crevasses in the ice. When the snow in the crevasses melts, snow bridges can form over them. If these are thin enough, you will fall through. If you travel roped up, the rope and the rest of the people in the rope team will keep you from falling far down into the crevasse. On blue ice — ice on a glacier where the snow has melted away — the crevasses are visible. It is recommended to always travel roped up on a glacier, including on blue ice. But it is possible to travel without a rope where the risk of getting hurt is small, for example a flat area of ice with no crevasses. One reason to unrope from the rope team can be to pee.
In late winter/spring you can often travel safely on skis, without a rope, on top of the glacier. This is because the crevasses are filled with snow. On the way up the glacier, up the icefall, you will often need to use a rope even in winter because the crevasses here can be large and hard to cross (Haslene, 2008).
The glacier has its own weather system, and the weather can change quickly. The weather can turn from brilliant sunshine to sleet and fog in under half an hour. That is why it is important that we always bring a map and compass on the glacier and know how to navigate.
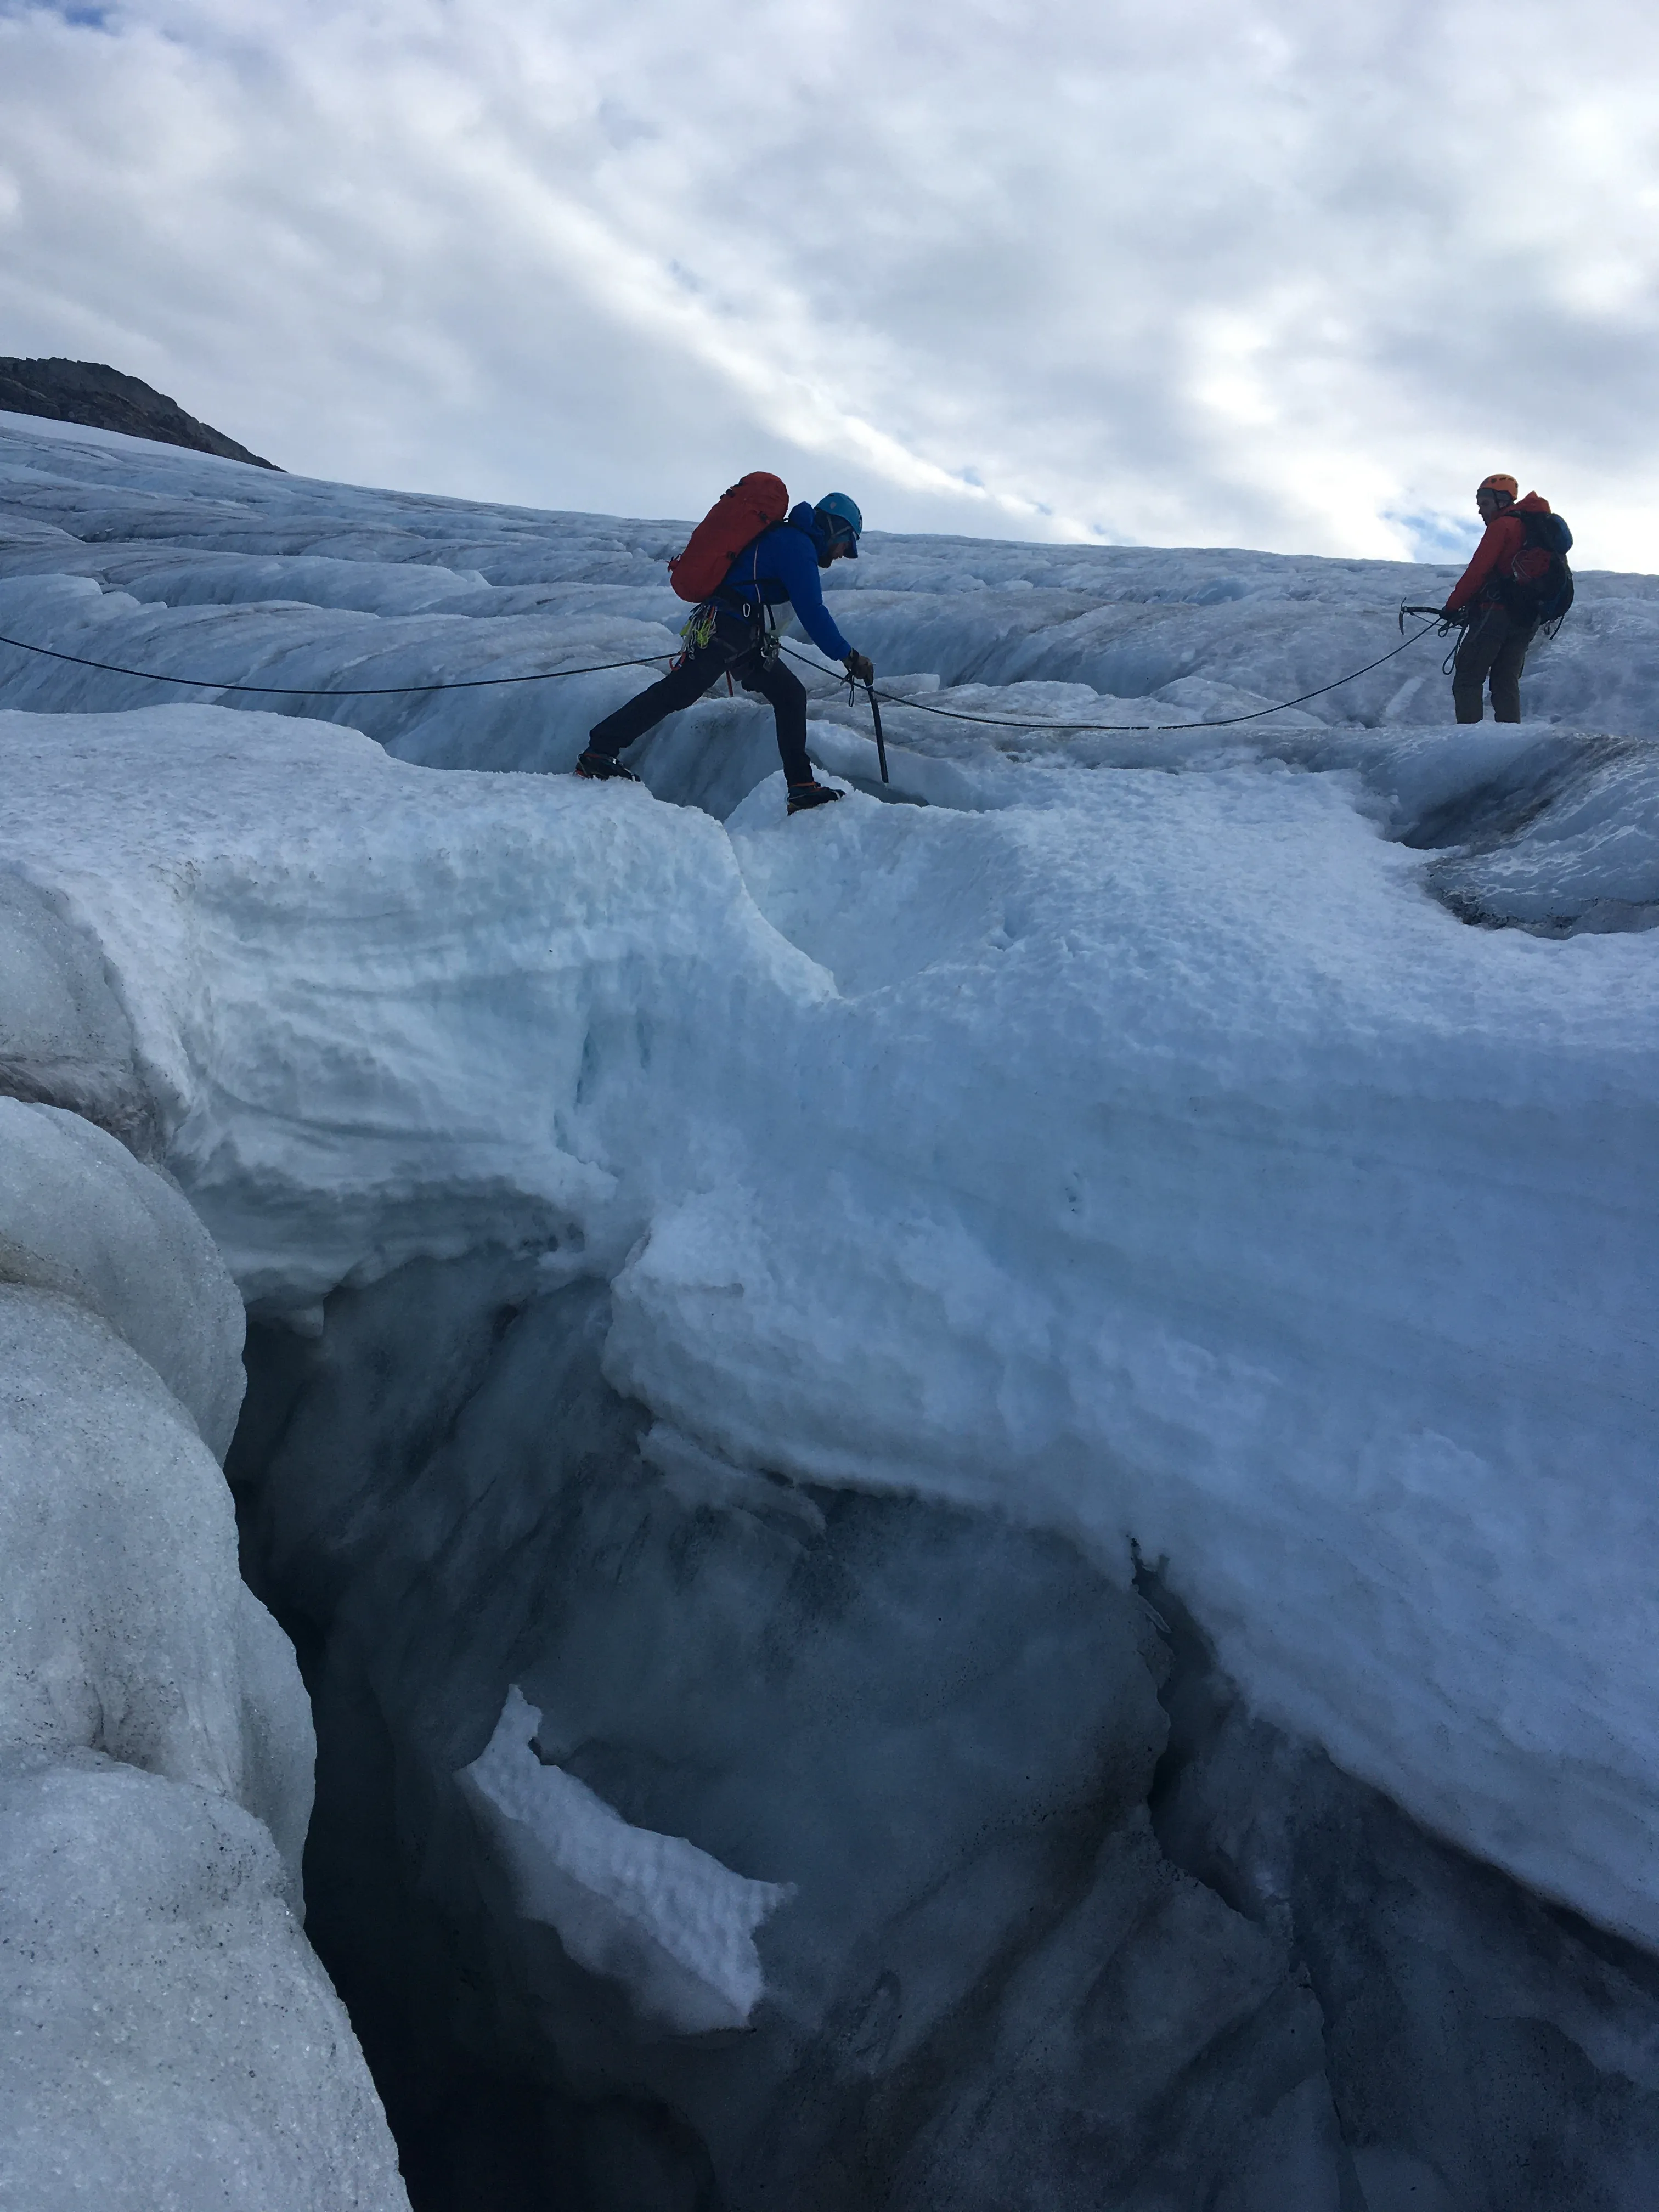
Photo: Gina Wigestrand, Snuitide
How glaciers form
Glaciers form when snow collects in an area and does not melt before new snow arrives the following year. When enough snow has accumulated, the lowest snow is subjected to such great pressure that it is turned into ice. The ice moves downwards, towards lower terrain, like a frozen river. At the bottom the ice is fully plastic as a result of the great pressure, while at the top it cracks open. In Norway the crevasses do not become more than 30 metres, but in polar regions the crevasses can be up to 100 metres deep (Liestøl, O., Hagen, J. O. & Nesje, A, 2020).
Glacier courses
On the blue ice of Bondhusbreen, Folgefonna. Photo: Gina Wigestrand, Snuitide
What you learn on a glacier course
If you would like to learn more about travelling on a glacier, it is recommended to take a glacier course. The trekking association and several private firms run glacier courses in various places around the country. It is wise to choose a course that is “NF-approved”. Norsk Fjellsportforum, abbreviated NF, has drawn up a template for the content of glacier courses and climbing courses, among others. If you take a course that follows the NF standard, there are clear requirements for what the course must contain and for the instructors on the course having the competence they should have to run the course.
Where you can take a glacier course
More about glacier travel and glaciers
- Facts about glaciers
- Breboka
- here you will find what you need to know about glacier travel
Next steps
- Climbing — the hub
- Avalanches — the same terrain, related risk
- Turning back in good time — judgement on the glacier
- First-aid equipment — equipment for the rope team and rescue
Learn more
- Norsk Fjellsportforum — course standard for glacier travel
- Norges Klatreforbund — club and federation
- DNT Breboka — handbook on glacier travel